The "OnSIS Prerequisites and Monthly Tasks - Step 1" is the initial document in a two-part series for OnSIS. Steps 2-4 will be detailed in a separate document, divided between Elementary and Secondary. This guide serves both Elementary and Secondary levels and aims to outline the tasks that should be performed monthly to ensure data accuracy. The table of contents provided below offers links for easy navigation within the document.
TABLE OF CONTENTS
- Introduction
- All Students require an OEN number.
- Validate OENs in OnSIS
- Run Full-time and Part-Time Enrolment Registers
- Enrolment Reports
- All instructional staff require a MEN
- Get a MEN (Ministry Educator Number) from the Ministry
- Enter all missing MEN Numbers into a Staff Record
- Elementary - Homerooms and Subject Classes need teachers
- Update all educators in OnSIS
- Cards within the Edsembli OnSIS Module to aid in the preparation
- Pre-Validation Card
- Setup Card
- Elementary Setup
- Secondary Setup
- Get Extract Files from OnSIS
- Conclusion
Introduction
These are the mandatory areas that need to be completed before beginning OnSIS. It is recommended that you do these things monthly so that you do not have many errors before you begin the process.
Step 1 focuses on making sure that we are as prepared to start the process as we can be. These steps can be taken monthly to ensure that data is accurate so that there are not a lot of data corrections come submission time.
All Students require an OEN number.
- Identify students without an OEN.
- If a student is a beginner or homeschooled and has never attended a public school before, assign them an OEN. https://oen/edu.gov.on.ca
- If a student has attended a public school before in Ontario, they will have an OEN. Retrieve the OEN from the OEN website using the information regarding the student. If you have the OSR, the OEN will be on the OSR or the student’s report card.
- Make sure that the OEN is added to the student’s record.
- Once all the students have an OEN assigned, ensure all registration data has been entered in the student record correctly and added to the correct Homeroom.
- If a student is a beginner or homeschooled and has never attended a public school before, assign them an OEN. https://oen/edu.gov.on.ca
Identifying students without an OEN allows users to make sure they can either find the OEN for the student and assign it in Edsembli or have one created for the student on the Ministry's OEN site and add the number to the Student Record in Edsembli.
1. Select the Hamburger Menu

2. From the available options, select 'Ontario Reporting.'

3. Select 'Ontario Education Numbers (OEN)

4. Select "GO" on the 'Students without OENs' card.

5. A list will be generated showing the students who do not have an OEN number. At this point, if you do have the OEN, you can select the student from this screen and enter the OEN in the Student Record > Student Enrolment area. However, if you want to check into each student on the list, select the 'Download' icon.

NOTES:
|
6. Click "Downloads, completed."

7. Open the downloaded file. Go through the list to determine whether you have or need to find the OEN for the students.

Validate OENs in OnSIS
The ‘Validate OENs in OnSIS’ card is necessary to run before every OnSIS submission. The data is checked to see if there is any mismatched information between the OEN site and Edsembli. You always want to keep your data clean.
1. Click 'Main Menu.'

2. Select 'Ontario Reporting.'

3. Select 'Ontario Education Numbers (OEN).'

4. Click 'CREATE' on the 'Validate OENs in OnSIS card.'

5. It is recommended to select 'Include optional fields (e.g. LEGAL_SECOND_NAME)' The location of the file is shown on this screen.

6. Click 'CREATE BATCH FILE' from the bottom right-hand corner.

7. A toast will pop up saying that the request has begun. Select 'OK.'

8. Once completed, select the 'Notification Bell.'

9. Click ‘Completed’ on the 'Generate OEN validation file.'

10. Click 'Download' on the file with the number string 'onsis.xml'

11. Click on the file location within the 'Create batch file' box - "Location of OEN file: ON > OEN > Request." You can also get to this file location through the 'File Manager.'

12. Select the checkbox beside the file name.

13. It will become highlighted.

14. Row-click on the file name. Select 'Download.'

15. Click ‘Downloads, completed.' Save this file to your computer.

16. To log in to the OEN site go to https://oen.edu.gov.on.ca. Select 'Generate Reports,' 'OEN Validation' then select 'Submit a file.'
DISCLAIMER:
The information found in this part of the document that references the Ministry OEN website contains general instructions to aid the user with the OEN Validation process and may change without notice. The OEN site is a Ministry of Education Software application and Edsembli is not responsible for the maintenance nor the instructions on how to use the OEN website. If you are experiencing any issues with accessing the 'Ministry OEN website' or for formal guidance on using the OEN software, contact your Ministry representative, not the Edsembli Support Team.

17. Select 'Choose File.' Find the file that you downloaded from Edsembli and select the file. Select 'Submit Request.' Once the file has been processed, you will receive an email.

18. Log back into the OEN site. Go to 'Generate Reports,' 'OEN Validation' and then select 'View Results.'

19. Click on the name of the file that has been 'Processed.'

20. The results will break down the numbers in each category. If there are 'Invalid' or 'Mismatch' errors, you will need to select 'Download Results.' This is the file you need to 'Save' on your computer. You will bring this file back into Edsembli.

21. Go back into Edsembli via Main Menu > Ontario Reporting > Ontario Education Numbers (OEN) > Validate OENs in OnSIS. This time, select 'PROCESS RESULTS.'

22. Select the 'Location of OEN file: ON > OEN > Results' to open the folder to add the downloaded 'OEN results file' from your computer into this folder for processing.

23. Select the '+' sign to add the saved downloaded file. Select the file location from your computer and select 'Open' to add the file to the 'File Manager' location.

24. Select the File by clicking on the box beside the file name. Select 'Close' from the bottom right-hand side of the list of files.

25. After you have completed the step above, the process will automatically return you to the 'Process results file' screen. Select the file by clicking on the box beside the file name. Select 'Process Results File' on the bottom right-hand side of the screen.

26. Select the 'Notification Bell' from the app bar. Select the 'Completed' file. Select either to 'Preview' the PDF file OR 'Download' the PDF file.

27. The file will look like the one displayed below. If your report shows errors, you will need to fix up the data. The data may be correct in Edsembli but incorrect on the OEN site or vice versa. The goal is to make both sites, Edsembli and OEN, match each other to prevent these mismatch errors.

Run Full-time and Part-Time Enrolment Registers
Make sure that all students are accounted for and are reported on the correct enrolment register. This option can be found in Ontario Reporting > Enrolment Registers. The options are different for Elementary and Secondary. Each will be displayed and identified in this area.
The Full-Time and Part-Time Enrolment Register card follows the Business rules and regulations provided by the Ministry of Ontario. Generally, the pupil's enrolment status is determined by the number of minutes a pupil is 'registered for classroom instruction' per school day. For more information on the yearly updated business rules, go to: https://www.ontario.ca/page/enrolment-register-instructions
This report can be run by the Board or School Level. In this example, it is being created at the school level.
- Select the 'Main Menu.'

2. Select the ‘Ontario Reporting.' chevron to expand to see the options.

3. Select 'Enrolment Registers.'

4. To create the 'Full-Time' Register, select 'GO' on the card.

Elementary Full-Time Enrolment Register
5. The default for the report is 'Official Registers.' You can change that option. 'Print all registers' is also the default under 'Registers by Grade.' You can select the register you would like to create. For 'Other Options,' the default is 'Alphabetically.' This can be changed to 'Homerooms.'

6. In the 'Details tab,' below you can see when the 'Other Options' has been changed to 'For each Homeroom' for the 'Summary Report.' 'School age students' is the selection for 'Report on,' and 'Designation' is selected for 'Sort Homeroom by.' Selecting the 'Floating action print button' will provide you with the details list.

7. This is a sample of the 'Details' report showing the Homeroom information, students, grades, Admissions information, and whether there have been any changes.

8. By Selecting the 'Monthly Summary' tab and selecting the same criteria as the details, it will give the user a breakdown by month of the number of students in each homeroom.

9. Once the report has been generated by selecting the 'Floating Action Printer button,' your request will be sent to the 'Notification Bell.' Once the report has been generated, select the notification bell to locate the file, or go to the 'File Manager.'

10. Select the 'Full-time summary - Completed.'

11. Click 'Preview - FullTimeRegisterSummary.pdf.'

12. Below is the 'Monthly Summary' report. You can see that there is a signature line, and they appear on the OnSIS submission period months. This is for the principal to sign as these are the official enrolment registers.

13. Click the 'back arrow' at the top-left inside Edsembli SIS to go back to the Enrolment Register screen or 'Close' at the bottom right-hand side.

Secondary Full-Time Enrolment Register
5. The default for the report is the ‘Details’ tab as well as 'Official Registers.' You can change that option. 'Grades 9-12' is also the default under 'Registers by Grade.' You can select the register you would like to create if other options are available. For 'Other Options,' the default is 'Alphabetically.' This can be changed to 'Homerooms.' To generate the report, select the Floating Action Printer button.


6. In the 'Monthly Summary tab,' below you can see that the defaults of 'Official Registers' are set to ‘Grades 9-12’ for ‘Summary by Grade,’ and that the ‘Other Options’ are selected as ‘For the entire school.’ The last option in this area is ‘Report on’ and the default is ‘School-age students.’ Selecting the 'Floating action print button' will provide you with the list.


7. By Selecting the 'Summary (FTE)' tab the user will be presented with selection criteria on which students you would like to create the report for. The default is ‘Alphabet’ but can be changed. The ‘Other Options’ in this report include a ‘Summary report’ where the default is ‘For the entire school’ and the ‘Report on’ information is defaulted to ‘School age students.’ The OnSIS dates for October and March are also populated. Selecting the 'Floating action print button' will generate the report.


Elementary Part-Time Enrolment Register
1. To generate the 'Part-Time' registers, select 'GO' on the 'Part-Time' card.

2. Select 'Official Registers' on the 'Details' tab.

3. Continuing, the 'Details' tab, just like the 'Full-Time' Registers, you can sort the list how you would like. You can choose to sort 'Alphabetically' or 'By Homeroom.'

4. Select the 'Floating Action Print button' to begin generating the 'Details' report.

5. A toast will pop up showing that you requested a report. Select 'OK' to confirm the request.

6. Once your report is ready, select the 'Notifications Bell.' Following the same steps as you did for the 'Full-Time' Register report, select, and preview the ‘Part-Time Detail' report.

7. If there are students that appear on this list, they are registered as part-time students. If they should not be, go to the 'Student Records' > 'Enrolment' and correct the data.

8. You can also run the 'Monthly Summary' report if you have students who were in your 'Details' report.

9. Follow the steps outlined in the ‘Full-Time’ report.

10. Select the 'Part-Time summary' report Completed.

11. Select 'Preview - PartTimeRegisterSummary.pdf.'

12. Here is a sample of the 'Part-Time' Monthly Summary report. Signature lines appear on this report at the OnSIS submission period dates, as this is the Official 'Part-Time' Enrolment register.

Secondary Part-Time Enrolment Register
1. To generate the 'Part-Time' registers, select 'GO' on the 'Part-Time' card.

2. The Options available are the same as generating the ‘Full-Time’ Register. You can select the Floating Action print button to begin the process.


3. The ‘Monthly Summary’ tab contains the same options as the ‘Full-Time’ Register. Make your selections and select the Floating Action printer button to begin the process.


4. The Part-Time ‘Summary (FTE)’ gives the same options as the ‘Full-Time’ Summary (FTE). Select your options and then select the Floating Action printer button to begin the process.


Part-Time SAL Enrolment Register
The Part-Time SAL register will show those students who are registered in the Program. The steps to create this register are the same as the Full-Time and Part-Time registers.
Details Report

Monthly Summary Report

Summary (FTE) Report

Other Board Pupils Enrolment Register
Other Board pupils are students who do not qualify for funding through the Ministry of Education’s definition of a ‘Pupil of the Board.’ These students may have resident statuses of the following:
- 02 - Indigenous Education Authority
- 03 – Government of Canada
- 05 - Study Permit/Temp Resident
- 07 - Other Student
- 08 - Shared Student
- 09 – Online Student
- Enter the date for the data to be generated. It is recommended to use the date of the OnSIS submission period you are currently working on.
- Select the Floating Action Print Icon
- Select the Notification Bell to view the results.


Enrolment Reports
To have a successful OnSIS submission, users need to add information into Edsembli accurately. The following reports will aid the user to check the accuracy of the data submitted.
Enrolment reports can help keep your data accurate. Running these reports monthly can help find any data errors before each of the OnSIS submission periods. The report options are similar, so by the end, you will be familiar with how to create them.
1. Click 'Main Menu.'

2. Select the chevron on the 'Student Reports' option to expand the selections.

3. Select 'Enrolment.'

4. It is recommended to run all these reports.
Grade Summary
- Begin with the 'Grade Summary' report by selecting 'THIS YEAR' on the card.

2. The card will open to the 'Report Options.' The report will default to today's date. If you want to change the date, select the 'calendar icon.'

3. In this example, an OnSIS submission count date is chosen.

4. The option to 'Include Gender Breakdown' is available. In this example, it has been selected.

5. There is also an option to include a ‘Separate column for Special Ed.' In this example, it has been selected. On the right-hand side, there is another box 'Main school holder of OSR.' What is selected are the defaults. In this example, the default selections have remained the same.
Elementary Options are displayed below.

6. At the bottom right-hand corner is the 'Floating action printer button.' Select this button to generate a PDF report. No other form can be generated.

7. A toast will pop up showing your report request. Select 'OK' to acknowledge your request.

8. Select the 'Notifications Bell' to see the results of your report or go to the 'File Manager' to find your report.

9. Select the 'Grade summary' Completed.

10. Select 'Preview - Grade summary.pdf'

11. Below is an example of the 'Enrolment by Grade' report.


12. Click the 'back arrow' at the top left-hand side within Edsembli, to return to the list of Enrolment Reports or use the 'Close' button on the bottom right-hand corner.

Age Summary
1. The next report on the list is 'Age Summary.' Select the 'RUN' option on the card.

2. The card will open to the 'Report Options.' The report will default to today's date. If you want to change the date, select the 'calendar icon.'

3. In this example, an OnSIS submission count date is chosen.

4. The option to 'Include Gender Breakdown' is available. In this example, it has been selected.

5. At the bottom right-hand corner is the 'Floating action printer button.' Select this button to generate a PDF report. No other form can be generated.

6. A toast will pop up showing your report request. Select 'OK' to acknowledge your request.

7. Select the 'Notifications Bell' to see the results of your report or go to the 'File Manager' to find your report.

8. Select the 'Age summary' Completed.

9. Select 'Preview - AgeSummary.pdf'

10. Below is an example of the 'Age/Gender Counts.'


11. Click the 'back arrow' at the top left-hand side within Edsembli, to return to the list of Enrolment Reports or use the 'Close' button on the bottom right-hand corner.

Homeroom Summary – Age/Gender
1. The next report on the list is 'Homeroom Summary.' Two reports can be generated. We will begin by selecting the 'AGE/GENDER' option first.

2. The report options on this card include the following: 'Homeroom' - you can either create for all homerooms or select individual homerooms. What is displayed are the defaults.
3. Sort by default is set to 'Room Number.' For this report, the selection is 'Designation' (the name of the Homeroom).

4. The 'Setup' option 'Other' allows you to select a month using the pull-down.

5. Following the OnSIS October submission information, this report has been generated for October.

6. At the bottom right-hand corner is the 'Floating action printer button.' Select this button to generate a PDF report. No other form can be generated.

7. A toast will pop up showing your report request. Select 'OK' to acknowledge your request.

8. Select the 'Notifications Bell' to see the results of your report or go to the 'File Manager' to find your report.

9. Select '- Homeroom summary Completed.'

10. Select 'Preview - Homeroom summary.pdf'

11. Below is an example of the 'Homeroom Summary (grade/gender).'

12. Click the 'back arrow' at the top left-hand side within Edsembli, to return to the list of Enrolment Reports or use the 'Close' button on the bottom right-hand corner.

Elementary - Homeroom Summary – Admit/Retire
1. The second report on the 'Homeroom Summary' can be created by selecting the 'ADMIT/RET' option.

2. The report options on this card include the following: 'Homeroom' - you can either create for all homerooms or select individual homerooms. What is displayed are the defaults.
3. 'Sort by' default is set to 'Room Number.' For this report, the selection is 'Designation' (the name of the Homeroom).

4. The 'Setup' option 'Other' allows you to select a month using the pull-down.

5. Following the OnSIS October submission information, this report has been generated for October.

6. At the bottom right-hand corner is the 'Floating action printer button.' Select this button to generate a PDF report. No other form can be generated.

7. A toast will pop up showing your report request. Select 'OK' to acknowledge your request.

8. Select the 'Notifications Bell' to see the results of your report or go to the 'File Manager' to find your report.

9. Select '- Homeroom summary Completed.'

10. Select '- Homeroom summary.pdf.'

11. Below you will see the results of the 'Homeroom Summary (adm/ret.)’

12. Click the 'back arrow' at the top left-hand side within Edsembli, to return to the list of Enrolment Reports or use the 'Close' button on the bottom right-hand corner.

Monthly Retirements
1. Select 'RUN' on the 'Monthly Retirements' card to generate the report.

2. The default month will be the one that we are currently in. Use the pull-down to change the date.
3. The 'Include retirements after the last day of school' option is if you want to include students who have an exit date as of July 1st. You may want to include this information in the report you create at the end of September.
4. The 'Program' options include the following: 'Regular program,' 'French Immersion' or 'Section 27.' If you have more than one program at your site, run this for each.

5. Following the OnSIS October submission information, this report has been generated for October.

6. At the bottom right-hand corner is the 'Floating action printer button.' Select this button to generate a PDF report. No other form can be generated.

7. Select the 'Notifications Bell' to see the results of your report or go to the 'File Manager' to find your report.

8. Select 'Monthly retirements - Completed.'

9. Select 'Preview - MonthlyRetirements.pdf.'

10. Below are the results of the 'Student Retirements for October - Regular Program.' If your schools offer the other programs as well, you will need to create each report separately.

Secondary – Preview of Monthly Retirements

11. Click the 'back arrow' at the top left-hand side within Edsembli, to return to the list of Enrolment Reports or use the 'Close' button on the bottom right-hand corner.

Monthly Admissions
1. To begin to generate the 'Monthly Admissions' report, select 'RUN.'

2. The default month displayed will be the one we are currently in. To change the month, use the pull-down.
3. The 'Program' options include the following: 'Regular program,' 'French Immersion' or 'Section 27.' If you have more than one program at your site, run this for each program.

4. Following the OnSIS October submission information, this report has been generated for October.

5. At the bottom right-hand corner is the 'Floating action printer button.' Select this button to generate a PDF report. No other form can be generated.

6. A toast will pop up showing your report request. Select 'OK' to acknowledge your request.

7. Select the 'Notifications Bell' to see the results of your report or go to the 'File Manager' to find your report.

8. Select '- Monthly Admissions Completed.'

9. Select 'Preview - Monthly admissions.pdf.'

10. Below are the results of the 'Student Admission list for the Month of October - Regular Program.' If your schools offer the other programs as well, you will need to create each report separately.

Secondary – Preview of Monthly Admissions

11. Click the 'back arrow' at the top left-hand side within Edsembli, to return to the list of Enrolment Reports or use the 'Close' button on the bottom right-hand corner.

Enrolment on a date
1. The 'Enrolment on a date' card is extremely important for OnSIS count dates. Select 'RUN" to generate the report.

2. The card will open to a page displaying 'Other' defaulting to today's date. If you want to change the date, select the 'calendar icon.'

3. In this example, an OnSIS submission count date is chosen.

4. At the bottom right-hand corner is the 'Floating action printer button.' Select this button to generate a PDF report. No other form can be generated.

5. A toast will pop-up showing your report request. Select 'OK' to acknowledge your request.

6. Select the 'Notifications Bell' to see the results of your report or go to the 'File Manager' to find your report.

7. Select 'Enrolment on a date - Completed.'

8. Select 'Preview - Enrolment on a date.pdf.'

9. Below are the results of the 'Enrolment on a date.' It gives the list of each student, their OEN, Enrolment Status, and Board Resident Status. If any of the information displayed is incorrect, please go to Student Records > Enrolment and correct the information. The report is the same for both Elementary and Secondary.

Tip! At the bottom of the report. You will see the total student counts.

10. Click the 'back arrow' at the top left-hand side within Edsembli, to return to the list of Enrolment Reports or use the 'Close' button on the bottom right-hand corner.

Principal’s monthly report
1. The 'Principal's monthly report' is another important report for keeping track of student information. To begin this report, select 'RUN.'

2. The default month displayed will be the one we are currently in. To change the month, use the pull-down.

3. Following the OnSIS October submission information, this report has been generated for October. The default will always be the current month.

4. At the bottom right-hand corner is the 'Floating action printer button.' Select this button to generate a PDF report. No other form can be generated.

5. A toast will pop-up showing your report request. Select 'OK' to acknowledge your request.

6. Select the 'Notifications Bell' to see the results of your report or go to the 'File Manager' to find your report.

7. Select 'Principal's monthly report - Completed.'

8. Select 'Preview - PrincipalMonthlyReport.pdf.'

9. Below is the 'Elementary Principals' Monthly Report.' It provides Admissions and Retirement as well as the 'Student Board Resident Status.'

Secondary – Preview of Principal’s Monthly Report

11. Click the 'back arrow' at the top left-hand side within Edsembli, to return to the list of Enrolment Reports or use the 'Close' button on the bottom right-hand corner.

Part-time students list
1. The 'Part-time students list' gives a list of students enrolled as part-time students on a particular date. Select 'RUN' to begin the report.

2. The card will open to a page displaying 'Other' defaulting to today's date. If you want to change the date, select the 'calendar icon.'

3. In this example, an OnSIS submission count date is chosen.

4. At the bottom right-hand corner is the 'Floating action printer button.' Select this button to generate a PDF report. No other form can be generated.

5. A toast will pop up showing your report request. Select 'OK' to acknowledge your request.

6. Select the 'Notifications Bell' to see the results of your report or go to the 'File Manager' to find your report.

7. Select 'Part-time students list - Completed.'

8. Select 'Preview - PartTimeStudents.pdf.'

9. Below you will see the 'Part-time students list' for a particular date. If there are students displayed on this list, verify that the students listed should be part-time. If the information is inaccurate, go to the Student Record > Enrolments and correct the data.

Secondary – Preview of Part-Time Students List

10. Click the 'back arrow' at the top left-hand side within Edsembli, to return to the list of Enrolment Reports or use the 'Close' button on the bottom right-hand corner.

All instructional staff require a MEN
Make sure that all instructional staff including Principals and Vice Principals have been entered into Edsembli and that they have been assigned a MEN number. The best way to locate this information is by creating the ‘Print List’ in Staff Reports. If your board uses Edsembli HRP, the information will be entered from the HRP system. These instructions are for non-Edsembli HRP users.
Create a Staff Report
Every school needs to make sure that all instructional staff has been assigned a MEN number. By using the Staff Report and selecting the correct options, users can easily identify missing information.
1. Click "Main menu"

2. Select 'Staff Tools.'

3. Select 'Staff Reports.'

4. Click "GO" on the 'Print Lists' card.

5. Uncheck 'Each surname initial on a separate page.' Leave all other default selections checked.

6. Select the "NAME FORMATS" tab.

7. Select the 'Staff number.'

8. Select the 'MEN.'

9. Click "STAFF INFORMATION"

10. From this screen, only select 'Role.'

11. Click the ‘Floating action 'Print' button.'

12. A toast will pop up letting you know that your request to generate this report has begun. Select 'Ok.'

13. Once your report has been generated, select "Your notifications" to see your options.

15. Click "Completed" on 'Print staff list.'

16. Click 'Preview-Staff List.pdf'’

17. Review the list to see which instructional staff are missing MEN numbers.

Get a MEN (Ministry Educator Number) from the Ministry
This step may or may not pertain to each user. Some boards may use different methods or have someone dedicated to getting MEN numbers for the various staff. If this is not your task, please disregard it and move to the next pre-requisite.

Users with Administration access to the OnSIS website can log in by going to https://onsis.edu.gov.on.ca

- Users should look for the ‘Administration tab’ and then navigate to the ‘Educator Administration’ area.
- Select the ‘Request Ministry Education Number’ hyperlink.

3. Fill out the required information and wait for the MEN to be assigned.
4. Log out when finished
Enter all missing MEN Numbers into a Staff Record
Like the OEN for students, the MEN (Ministry Educator Number) is a 9-digit unique number that is assigned to educators in Ontario. This includes Ontario College of Teachers (OCT) members, non-OCT members, some private schools, temporary teachers, and educational services (Speech pathologists). Edsembli requires that this number be entered for educators and this document will show you where to add the information.
1. Click "Main menu."

2. Select 'Staff Records.'
3. Enter the last name of the staff member and select the 'Floating Action Search button.'

4. Select the staff member to be updated.

5. From the 'Staff Records Menu' select the 'Personal' chevron to expand the options.

6. Select 'Name' from the available options.

7. Select the 'Edit Pencil.'

8. Click on the 'MEN#' area.

9. Enter the MEN number. Be sure to enter without spaces or dashes. Edsembli will save it in the correct format. SAVE when finished.

Elementary - Homerooms and Subject Classes need teachers
Before any OnSIS submission or Report cards, it is important to ensure that all Homerooms and all Subject Classes have teachers assigned.
1. Click "Main menu."

2. Select 'Setup.'

3. Select 'Class info.'

4. Click "THIS YEAR" from the Homerooms card.

5. Scan the list to see if Teachers have been assigned to the correct Homeroom, and that the 'Room Numbers' and 'Designation' (Homeroom name) are accurate. If not, correct the data. If corrections have been made, SAVE. If no changes have occurred, select the Back arrow at the top left.

6. Select 'THIS YEAR' from the 'Classes' card.

7. The subject classes will be displayed in Alphabetical order. To sort by the 'Teacher name’, select the arrow beside the column called 'Teacher(s).'

8. Select the arrow beside the 'Teacher(s)' column again, to complete the sort.

9. This is the result of the sort. You can easily see if each subject has been assigned a teacher and whether the teacher assigned is correct. If you need to change, now is the time to complete that task.

10. Click "Close" from the bottom right-hand corner when finished.

Secondary - Classes require teachers and students
Before any OnSIS submission or Report card creation, it is important to ensure that all classes have teachers and have students assigned.
1. Click "Main menu."

2. Select 'Setup.'

3. Select 'Class info.'

4. Click "THIS YEAR" from the Classes card.

5. Schools with many classes may want to ‘Export’ the Master School to be able to sort and easily find missing information. From the Classes page, select the Ellipsis from the right-hand side of the ‘Classes (This Year)’ app bar to see ‘More Options.’

6. Select ‘Export.’

7. The file will be sent to your ‘Downloads.’ Open the Excel file and save it with a meaningful name. The data will look like what is displayed below. You will want to sort this data to find the missing teachers for the correct semester and submission period. The spreadsheet created has been altered to hide some unpopulated areas. Your file may have more areas populated. The column header names have been changed as well.
Submission Period | Semester | Dates |
October | Sem 1 | September 1 – October 31 |
March | Sem 1 | November 1 – January 31 |
March | Sem 2 | February 1 – March 31 |
June | Sem 2 | April 1 – June 30 |

NOTE: A user can column sort within the Master Schedule as well. If you have many classes, this may not be the best solution.

8. Assign the teachers to the classes that are missing for this submission period. Find the class, ‘Row-click’ and select ‘Edit.’

9. Use the pull-down beside ‘Teacher’ and select the teacher.

10. If some classes are without students and these courses are not being offered, they can be removed from the Master Schedule as long as:
- They have not been sent to OnSIS in a previous submission.
- Students have not been assigned to the class and have had attendance and/or achievement entered. If they have, this information would need to be removed from each student who was entered into the wrong class before the class could be removed.
- To remove a class that has never had any students and the class has never been sent to OnSIS in a previous submission, row-click on the class name. Select ‘Edit.’ Locate the ‘delete’ on the ‘Edit Class app bar’ on the right-hand side. Select the ‘delete’ and remove the class.

- Click "Close" from the bottom right-hand corner when finished.

Update all educators in OnSIS
Before extracts are generated for an OnSIS submission period, educators must be updated in OnSIS. This task may be performed by someone in HR, or it might be you depending on your role. These instructions will be for someone who will be entering this information. If you are doing this for multiple schools, be sure to have a staff list that has all the necessary information for each school, such as:
- Staff name
- MEN
- Assignment Start Date
- Position
- FTE – Cannot be greater than 1.00.
- Withdrawal Type – if the staff have left
Important things to note regarding educators:
- Their FTE (Full-time equivalency) cannot be greater than 1.0 – if they are a shared teacher watch the FTE.
- If you flag your educator as Teaching/Leading they must be associated with classes/courses/subjects.
- LTOs should be terminated using an end date.
- Elementary Homeroom teachers must have the Core check box selected.
- Subject-only teachers do not have the core box selected. Leave Blank.
- Non-teaching educators must have an instructional type associated with them.
- Principals and Vice-Principals must have an instructional type associated with them.
- ECE is always Teaching/Leading but do NOT click the Core Box.
Below are some examples of various roles and how they may be OnSIS educators may be set up on the OnSIS site.

TRANSFER - Principal/Vice Principal/Teacher
Regardless of whether a Principal/Vice Principal or Teacher is no longer at a school site during a submission period, their record will need to be updated in OnSIS.
Once logged into OnSIS and are in the ‘Educator List,’ locate the staff to transfer. Displayed in the example below is a principal.

1. Teaching-Leading/Non-Teaching is changed to N/A-Not Applicable
2. Remove any information in ‘Instructional Type.’
3. Enter the ‘Withdrawal Type’ – TRA – Transfer
NOTE: Other Leave types may include but are not limited to. The HR department would have this information:
|
4. ‘Assignment end date’ (If an educator’s assignment ends during the school year, use the date provided. If an educator’s end date is between July 1 – August 31, use September 1 as the ‘Assignment End Date.’
5. Looking at the Assignment List, the Assignment End Date should populate.
Homeroom Teacher/LTO
The setup for a Homeroom teacher (who can also be an LTO), has a setup like the following:

- Position – TEA – Teacher Regular
- Teaching-Leading/Non-Teaching – Teaching-Leading
- Assignment Start Date – Enter the date they started.
- FTE – must not be greater than 1.00.
- Core Elementary Teacher – Box selected.
- Assignment List – Name of Homeroom Class
NOTE: An LTO would have the same setup except for the Position and possibly the FTE. The position set up for the LTO would be: LTO – Teacher, LTO
Early Childhood Education (ECE)
Even though the ECE is assigned to a class, they are not the Core Elementary teacher.

- Position – Early Childhood Educator
- Teaching-Leading/Non-Teaching – T – Teaching-Leading
- Assignment Start Date – Enter the start date.
- FTE – Not greater than 1.00
- Assignment List – The Homeroom that the ECE has been assigned.
Teachers who are both Teaching and Non-Teaching
At some schools, you may have a teacher who also teaches multiple subjects but is not the Homeroom teacher. This person would also have additional non-teaching duties as well. They could have different assignments. In the example below, the teacher has ‘Miscellaneous Assignments.’

- Position – TEA – Teacher, Regular
- Teacher-Leading/Non-Teaching – B – Teaching-Leading/Non-Teaching
- Assignment Start Date – Enter the date.
- FTE – Must not be greater than 1.00.
- Instructional Type – Select the appropriate type from the list for that scenario.
- Assignment List – The list of classes will be show
Non-Teaching Teacher, Specialty
If you have a teacher at your site who is a Special Education Teacher and does not have a Homeroom and they do not have classes associated with them, their setup will look similar to that below:

- Position – SPE – Teacher – Specialty
- Teaching-Leading/Non-Teaching – Non-Teaching
- Assignment Start Date – Enter the date.
- FTE – Must be less than 1.00.
- Instructional Type – SED – Special Education
- Assignment List – No classes are listed, just the Position, FTE, and Assignment Start Date.
Vice-Principal, Non-Teaching Teacher, Specialty
Schools may encounter some sites where the VP does not teach but they are also the Special Education Teacher. The setup below gives an example of how it may be set up.

- Position – V – Vice Principal
- Teaching-Leading/Non-Teaching – N – Non-Teaching
- Assignment Start Date – Enter the date.
- FTE – Must not be greater than 1.00.
- Instructional Type – Select both options
- ADM – Administration
- SED – Special Education
- Assignment List – Just the position, FTE, and the Assignment Start Date should show in this area.
NOTE: To add a principal who does not have any teaching assignments, follow the same steps as setting up the VP, but remove the SED – Special Education.
Cards within the Edsembli OnSIS Module to aid in the preparation
Up until this point, there have been many steps in preparing for OnSIS. It can feel like a daunting task, but remember, if the data has been entered accurately, these tasks are just for checks and balances to make sure your data is accurate to prevent the starts and stops in the process of submitting OnSIS.
More Verification Reports Card
- Found within the OnSIS cards in Edsembli. Compare the edsembli-generated verification reports with the corresponding reports in OnSIS to ensure that the Ministry has complete and accurate info. As the OnSIS system evolved, so did Edsembli. They added Other Verification Reports for that purpose to be able to verify that the information that has been provided to OnSIS is accurate as new information is gathered by OnSIS.
The 'More Verifications Report' in the OnSIS module can be used for more than just the end process of OnSIS to verify the reports listed. It can also be used before the OnSIS process begins to see if data correction is necessary. It can also be used at the end of each month to help keep the data accurate. The process that is being shown is being completed at the School Level.
1. Select the 'Main Menu.'

2. From the 'Main Menu,' select 'OnSIS.'

3. Working within the correct submission period, if all cards are not visible, select 'More' to see all available cards.

4. Locate the 'More verification reports' and select 'GO.'

5. Select one of the files by selecting one of the boxes.

6. The user does have the ability to 'Select by' to narrow down the search for certain students or select for all students. Select the Floating Action Printer button to generate the report.

Secondary – More Verification Options

7. Select the 'Notification bell' once the report has been generated.

8. Select the 'OnSIS verification - Completed.'

9. Select the 'Preview' of the report that has been generated. It will be in PDF format.

10. The generated report will look like the one shown below depending on the report selected.

Secondary - Preview of More Verifications – SAL

Verification Reports Card
- Found within OnSIS Cards in Edsembli. A question you may be asking is why am I running this report now? Look at the information that is presented in both the detail and the summary reports. You will be able to verify the information on the reports is accurate before you ever begin the OnSIS process. This report pulls all the information into these pre-built OnSIS reports based on the Ministry’s Business Rules. It gives you the ability to correct and update information before you even begin the process.
- Allows users to see the Summary information for each report that would be submitted to OnSIS. The user can also create a detailed report of a specific section. This shows the user what information is in Edsembli for that section.
1. Select the 'Main Menu.'

2. Select the chevron to expand the 'OnSIS' options.

3. Select the submission period that you are working in.

4. If all cards are not displayed, select the 'MORE' option.

5. Now with the options expanded, select 'Verification Reports.'

6. If you are looking to get the number of students in each section, broken down into each category as determined by the Ministry of Education business rules, the default, 'Verification Report' is where to begin.

7. Select the 'Floating Action Print Button' from the bottom right-hand side to generate the report.

8. A toast will pop up showing you that the process has begun. Select 'OK' to acknowledge.

9. Once the report has been generated, select the 'Notification Bell,' or go to the 'File Manager' to locate the generated report.

10. Select the file 'OnSIS validation report - Completed.'

11. Select 'Preview - Validation.pdf''

12. Below is a sample of the 'Summary' report.

Secondary – Preview of OnSIS Validation Report

13. To see the list of students on the report, they will use the following three steps:
- From the Verification Report - card, select 'Students in a specific section.'
- From the options within the 'Specific Sections Options,' select the report to be generated. Only one report can be generated at a time.
- Once an option has been selected, the 'Floating Action Printer Button' will be illuminated, and you will be able to generate the report.

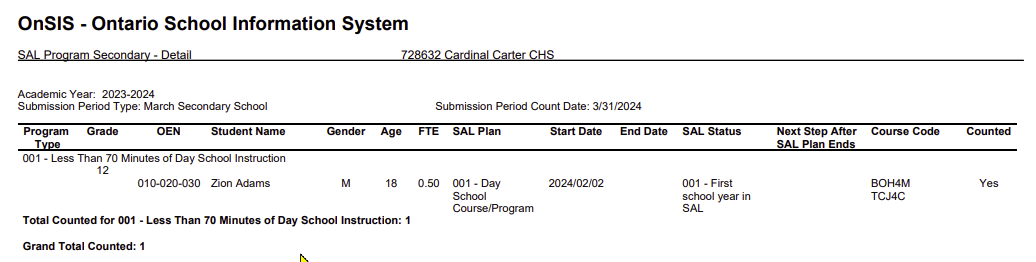
14. Below is an example of Section F - Detail Report. It easily identifies the students in each category and Program. For this report, the FSL Instructional minutes are important. Now, you can take the information from these reports, and correct any data.

NOTE: Both the More Verifications Report and the Verifications Report will be used in Step 3.
Secondary – Section K – Enrolment Transfers, Retirements – Detail Report

Above is an example of Section K – Student Enrolment Transfers, Retirements - Detail Report. It easily identifies the students in each category. This report shows the user which students were transferred or retired during the selected submission period. You can take the information from these reports and correct any data.
Pre-Validation Card
Found within OnSIS Cards in Edsembli. This is the first card on the list. Now that the other Prerequisites have been completed, it is time to look at the Pre-Validation card in the Edsembli OnSIS Module. Before generating Extract files for the OnSIS submission, reports can be run to detect any possible errors and warnings that will occur based on OnSIS business rules.
This report will aid in looking for those critical OnSIS errors and warnings before submitting any data to OnSIS. A tool to be used before every submission.
1. From the Edsembli OnSIS submission period, select 'CREATE' on the Pre-Validation list.

2. Each of these reports should be created one at a time. It will say 'Batch Files' but these are not the files that are uploaded to the OnSIS site. Select the report to look at first. In this example, 'Student info errors' has been selected.

3. From the bottom right-hand corner, select the 'CREATE*'* button to generate the report.

4. A toast will pop up and select 'OK.'

5. Once the report is completed, select the 'Notification Bell' or go to the 'File Manager.'

6. Select - 'OnSIS pre-validation report - Completed.'

7. Select 'Preview - PreValidationErrors_Student.pdf'

8. This report will show the Errors first and what part of the Ministry Business Rules it violated. The bottom portion of the report shows the Warnings. They are not currently errors, but those rules may change in the future.
- Once the data has been corrected in the various parts of the student data, run the report again to make sure that all errors and warnings are no longer on the list.

TIP! Completing the Pre-Validation on a month-end basis will help to maintain your data and make OnSIS more streamlined.
Secondary – Preview of OnSIS pre-validation report – Completed

Setup Card
Found within the OnSIS cards in Edsembli. Check to see if the submission period has any specific options, otherwise use this to quickly access the file manager locations of the extracts, batch files, and results files.
The Setup Card works to show the users where they can easily find the different files necessary for OnSIS. It also prepares some mandatory information for the submission which will be shown in this document.
1. From the correct OnSIS submission period, select 'GO' on the 'Setup' card.

Elementary Setup
2. The screen will be divided into 2 sections. The first part will show the user the 'File Manager' locations of each type of file. The second part, for Elementary schools, shows the 'Homeroom Aliases' information, which in Edsembli are called the 'Designation.' Split grades with Multiple sections, give the school a way to have same-grade classes send up the data with unique Homeroom names.

Secondary Setup
2. The screen will be divided into 2 sections. The first part will show the user the 'File Manager' locations of each type of file. The second part, for Secondary schools, shows the 'Grade 10 to 12 Designation Types.’ Some schools may assign grades to students using different methods. OnSIS collects information about how a grade 10 to 12 student’s grade is assigned in a field called GRADE_DESIGNATION_TYPE in the batch files. There are 3 possible methods that the Ministry considers appropriate for determining a student’s grade:
- Years of attendance: This designation type describes schools where the student’s grade is based on the number of years the student has attended high school (e.g. grade is automatically advanced regardless of the student’s academic success).
- Accumulated credits: This designation type describes schools where the student’s grade is based on the credits earned.
- Principal designation: This designation type describes schools where the principal designates what grade is most appropriate for the students.
Most schools designate grades based on years of attendance. This may be changed by selecting the drop-down arrow to select from the 3 possible types. Grade 12 students can have different designations based on credit counts. Credit counts are based on the accumulation of credits at the end of the school year. Timetable and transcript credits are totaled for the grade 12 M and U courses.
This grade designation setup will be saved and used for all applicable submission periods. This will ensure that the same designation type is used throughout the school year.

3. Below is an example of where the user navigates when they select the File Folder from the Setup Card for CSV files. This is where the CSV files from OnSIS will be uploaded to. Selecting the 'x' in the top-right-hand corner will close the File Manager and return you to the Setup card screen.

4. Once you have begun the OnSIS, the generated XML - Batch Files to be uploaded to OnSIS will be in the '(XML files created in edsembli): ON > OnSIS > Batch files > March' Clicking here will take you to the file location.

5. This is an example of a file within the File Manager location. Close the File Manager and that will return the user to the Setup Card.

6. Select the "Location of result files (OUT files from OnSIS): ON > OnSIS > Results > March" to go to the File Manager location. This is a file that you upload from OnSIS to see the results of your processed Batch file. It makes the file into an easily read document where you can see if there are errors or warnings to be looked at and data corrected.

7. This is an example of a file within the File Manager location. Close the File Manager and that will return the user to the Setup Card.

Get Extract Files from OnSIS
This is not a card within the Edsembli OnSIS module and is not part of the monthly tasks. It should only be performed when starting the OnSIS process and the submission period is open. Before creating any batch files in Edsembli, extract files (CSV files) need to be created in the Ministry’s OnSIS application. They will then need to be downloaded into Edsembli SIS to the File Manager and processed. Extracts determine the information that will be submitted, such as ‘Add’ new information, ‘Update’ corrected information, or ‘Delete’ incorrect data when ‘Batch files’ are created.
Disclaimer: The information found in this document that references the Ministry OnSIS
The website contains general instructions to aid the user with the OnSIS process and may change without notice. OnSIS is a Ministry of Education Software application and Edsembli is not responsible for the maintenance nor the instructions on the use of the OnSIS site. If you are experiencing any issues with accessing the ‘Ministry OnSIS’ site or for formal guidance on using the OnSIS software, contact your Ministry representative NOT Edsembli Support.
Sign in to the Ministry OnSIS website https://onsis.edu.gov.on.ca
Make sure the submission period is open in OnSIS and ready for use.
Request the CSV files from the previous submission:
- Within OnSIS, select Queries, Reports, and Extracts (from the top menu bar).
- Select Run Extracts.
- Select SMS Extracts (SMS = student management system).
- Select Extracts List.
- Select Data Submission SMS Extracts.
- Enter the Academic Year (i.e., 20xx-20xx) and Submission Period (i.e., October).
- Select the correct schools if needed.
- Select the button for Check All (to get all extracted files).
- Select the button Run Immediately (further down the page) to generate the extract files.
NOTE: The screen should take you automatically to the list of the extracts being generated.
j. Select Refresh until all extracts are shown in the lower portion of the screen under ‘Generated Extracts.’ If it is not practical to wait for the extracts, go back to the OnSIS application later and select ‘Queries, Reports and Extracts, View Extracts.’
k. Once all extracts are generated, select the Check All Generated Extracts button at the bottom. This will select all the files, then select Download Selected Extracts.
l. From the prompt in the yellow window at the bottom of the screen, select the down arrow beside ‘Save’ and select ‘Save As,’ and save the file in a secure location.
- NOTE: The file that is downloaded from OnSIS, is a zip file containing all the generated extracts. You now need to unzip this file.
m. From your Desktop, browse to the location where you saved the zip file (above), and open it. (double-click) this zip file.
n. Select the Extract All Files option to unzip all the files in the same location. Make sure you know where the files are saved.
Individual School
- From the ‘Main Menu’ of Edsembli SIS select ‘OnSIS.’
- Pick the submission period you are doing. (October, March, or June). Cards will guide the user through the OnSIS process.
- Select the ‘Setup’ card.
- Select the Folder at the top ‘Location of extract files (CSV files from OnSIS): ON > ONSIS > Extracts > ‘SUBMISSION PERIOD’
- Select the ‘+’ sign to add the files from your saved location (HINT: Use CTRL or SHIFT to select all files at the same time. Once selected, use the OPEN button to upload them into the files area.)
NOTE: If extracts were requested for all schools, be sure to add the CSVs to each site.
Conclusion
With all the data as accurate as possible, it is time to go to Step 2. Use the Elementary OnSIS - Step by Step Guide or the Secondary OnSIS - Step by Step Guide using the steps to complete OnSIS.
Was this article helpful?
That’s Great!
Thank you for your feedback
Sorry! We couldn't be helpful
Thank you for your feedback
Feedback sent
We appreciate your effort and will try to fix the article